System restore points on Windows 11 are great built-in security, but you need to build them before you can use them. The Restore Point feature in Windows 11 is one of the many recovery options available to you. Whether you want to make changes to your registry entries, install new Windows updates, or simply want an easy way to fix problems with your PC, a restore point can help when things go wrong.
However, to use a restore point in the future, you must first create one now. And to create one, you must first configure your PC for restore points. Here we show you how to activate, create and use a restore point in Windows 11.
Read: How to Use and Enable Focus Assist Mode on Windows 11
Should You Create a Restore Point in Windows 11?
The Windows operating system can save a working backup image of your system at a certain date and time, which is called a restore point. If something goes wrong, you can use a restore point to undo the changes and return your system to its last working state.
A restore point includes Windows system files, installed programs, registry settings, and system drivers. It does not back up your files and folders.
Once configured, the Windows operating system automatically creates a new restore point before making any significant changes to your system, such as installing or uninstalling Windows Updates.
By default, Windows creates a new restore point every week and replaces it with the oldest one to manage storage space. However, you can manually create new restore points as many times as you want.
Having multiple restore points is helpful in troubleshooting system problems. For example, if a bad driver update causes your system to malfunction and uninstalling it doesn’t help, you can use System Restore to restore your PC to an earlier time when the problem existed. Wasn’t.
Does a System Restore affect my files and programs?
As stated earlier, Restore Point does not affect your files. However, all applications, hardware drivers and system updates installed after the restore point date will be uninstalled. This also applies to any changes you make at the system level, including system settings and other advanced changes.
Similarly, it will restore any uninstalled apps after creating a restore point. However, some programs may require reinstallation to function properly.
How to Enable Restore Point in Windows 11
For most users, the Windows operating system enables System Restore on your startup drive by default. This is more than likely your C:\ drive, but it may vary depending on your PC configuration.
Since the restore point feature is a great way to diagnose and fix problems, your PC probably has them enabled from day one. However, you can also manually enable System Restore in System Protection.
To enable System Restore:
- Press Win + S to open Windows Search.
- Type restore point and click Create a restore point from the search results.
- In the System Properties window, open the System Protection tab.
- Make sure that Security is set to On in the Security Settings section.
- If it is set to Off, click the Configure button.
- Select Enable system protection.
- Then drag the slider to adjust the storage size you want to allocate for saving restore points.
- Click Apply and OK to save the changes.
Repeat the steps to enable System Restore for the other drives available on your system. This is recommended if you are installing applications on drivers other than the C:\ drive.
How to Create a Restore Point in Windows 11
As stated earlier, the Windows operating system automatically creates a new restore point before a major system event such as installing a Windows update. You can also create restore points manually before making any changes to your PC or as a regular backup.
To create a restore point:
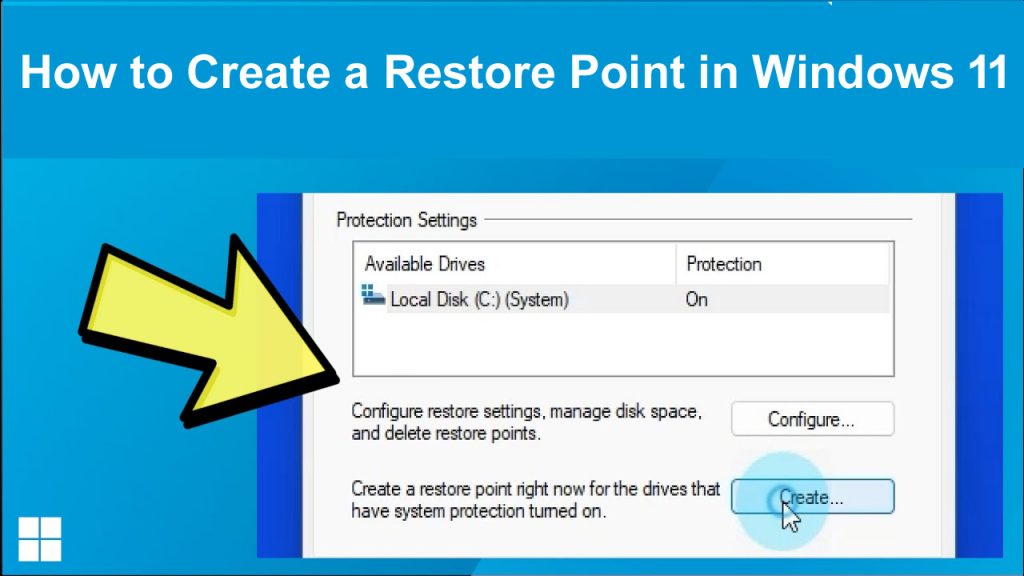
- In the System Properties window, open the System Protection tab.
- Click on Create button.
- Type a description or name for the restore point. It is recommended to include the event name along with the date.
- Click on Create. System Protection will start creating the restore point and will display a success message if it is successful. This may take a few seconds, so wait for it to finish.
- Click Close.
How to Use Restore Points to Restore Your Windows 11 System
You can perform a System Restore to undo system changes by reverting your computer to a previous restore point. That said, don’t use a Snap restore point. It is an efficient process, but it takes time. As such, use it only as a last resort to troubleshoot major system problems in Windows.
To use a restore point through System Restore:
- In the System Properties window, open the System Protection tab.
- Here, click on the System Restore button.
- In the System Restore window, click the Next button.
- You can see all available restore points and their types (manual/automatic) on the next page.
- Select the Show more restore points check box to display all hidden restore points when they are available.
- Click Search for affected programs. System Restore will now search for affected programs and drivers and display a list. This list includes programs and drivers that will be removed and reinstalled during the process.
- Click Close and click Next to continue.
- On the confirmation screen, read the description to understand the nature of the reinstallation and the drivers involved.
- Click the Finish button to confirm the action.
- System Restore will display an alert stating that System Restore cannot be interrupted once started. Click Yes to confirm and continue.
Windows will first create a restore point to the current state and then restart your PC to begin the restore process.
This process may take some time, so wait for your PC to display the login screen. Once logged in, a success message will be displayed if the restore was successful. If it fails, you can try the same or any other available restore point.
Creating and Using a Restore Point in Windows 11
System Restore is a useful utility for Windows users. It is more convenient than other recovery options that involve reset, upgrade, or reinstalling. If you end up with too many restore points and low disk problems, you can use the Disk Cleanup tool or manually delete the restore points from your PC.


0 Comments